Wordpress简介
- 官网
- 适合新手入门的博客框架,常用于个人博客的搭建,正如其名字一样,通过简单的几个
word即可搭建出一个博客
太长不看版
- 项目地址:Github
- 功能:通过
docker-compose,实现了利用容器搭建nginx+mariadb+wordpress的组合,在VPS中搭建个人博客
- 运行方式:详情见项目的
README.md
- 环境依赖:
docker
1
2
3
| sudo apt install docker docker-compose
git clone https://github.com/xiabee/wordpress-docker
cd wordpress-docker
|
搭建HTTP服务
1
2
3
4
| rm ./nginx/nginx_https.conf
docker-compose up -d
|
搭建HTTPS服务
如果要搭建https服务的话需要在nginx_https.conf中配置一下证书路径,并删除nginx.conf,重新构建服务。
1
2
| rm ./nginx/nginx.conf
docker-compose up -d
|
代码详解
docker-compose.yml
network模块这里直接跳过,就是定义一下网络类型和网络ID,这里不需要过多设置,我们直接跳到服务services模块
wordpress模块
1
2
3
4
5
6
7
8
9
10
11
12
13
14
15
16
17
18
19
| wordpress:
image: wordpress:5.8.1-php8.0-fpm
volumes:
- ./wordpress:/var/www/html
environment:
WORDPRESS_DB_HOST: mariadb:3306
WORDPRESS_DB_USER: wordpress
WORDPRESS_DB_PASSWORD: wordpress-pass
WORDPRESS_DB_NAME: wordpress
depends_on:
- mariadb
restart: always
networks:
- xiabee
|
image:这里选择带有FPM的wordpress镜像,因为要配合nginx使用
volumes:建立目录映射,将容器目录映射到宿主机中,方便我们管理和维护容器的文件
environment:设置环境变量,用于设置数据库的密码
depends_on:设置依赖,这里wordpress需要依赖mariadb数据库启动
restart:设置重启方式,这里选择always,即挂掉就重启。
networks:这里直接用了前面定义的网络
mariadb
1
2
3
4
5
6
7
8
9
10
11
12
13
14
15
16
17
18
19
20
| mariadb:
image: mariadb:latest
expose:
- "3306"
volumes:
- ./mysql:/var/lib/mysql
environment:
MYSQL_ROOT_PASSWORD: root-pass
MYSQL_DATABASE: wordpress
MYSQL_USER: wordpress
MYSQL_PASSWORD: wordpress-pass
MYSQL_RANDOM_ROOT_PASSWORD: 1
command: [--default-authentication-plugin=mysql_native_password, --character-set-server=utf8mb4, --collation-server=utf8mb4_unicode_ci]
restart: always
networks:
- xiabee
|
command:使用命令方式登录,进行设置,避免BUG- 其他与
wordpress的操作基本相同
nginx
1
2
3
4
5
6
7
8
9
10
11
12
13
14
15
16
17
| nginx:
image: nginx:latest
ports:
- '80:80'
- '443:443'
volumes:
- ./nginx:/etc/nginx/conf.d
- ./logs/nginx:/var/log/nginx
- ./wordpress:/var/www/html
depends_on:
- wordpress
restart: always
networks:
- xiabee
|
- 这里注意目录映射的位置就行,其他和
wordpress的设置基本相同
nginx.conf
- 这个文件用来配置
http服务
- 开启
http服务时需要删除nginx_https.conf
1
2
3
4
5
6
7
8
9
10
11
12
13
14
15
16
17
18
19
20
21
22
23
24
| server {
listen 80;
server_name localhost;
root /var/www/html;
index index.php;
access_log /var/log/nginx/access.log;
error_log /var/log/nginx/error.log;
location / {
try_files $uri $uri/ /index.php?$args;
}
location ~ \.php$ {
try_files $uri =404;
fastcgi_split_path_info ^(.+\.php)(/.+)$;
fastcgi_pass wordpress:9000;
fastcgi_index index.php;
include fastcgi_params;
fastcgi_param SCRIPT_FILENAME $document_root$fastcgi_script_name;
fastcgi_param PATH_INFO $fastcgi_path_info;
}
}
|
listen:监听端口server_name:设置你的域名root:根目录地址location:设置访问的url,这里设置的是根目录的访问,即访问网站根目录时,跳转到/index.php上- 第二个
location用于监听9000端口的wordpress,对wordpress进行反向代理
nginx_https.conf
这个文件用于构建https服务
开启https需要提前拥有域名和证书
开启https服务时需要删除nginx.conf
禁止IP直接访问
1
2
3
4
5
| server {
listen 80 default;
server_name ~.*;
return 500;
}
|
这里创建一个server用于禁止IP直接访问
强制HTTPS
1
2
3
4
5
| server {
listen 80;
server_name domain name.com;
return 301 https://$server_name$request_uri;
}
|
这里的server用于强制全站使用https
设置证书文件
1
2
3
4
5
6
7
8
9
10
11
12
13
14
15
16
17
18
19
20
21
22
23
24
25
26
27
28
29
30
31
32
33
34
35
36
37
| server {
listen 443 ssl;
server_name domain name.com;
root /var/www/html;
index index.php;
ssl_certificate ./conf.d/domain name.com;
ssl_certificate_key ./conf.d/domain name.key;
ssl_session_timeout 5m;
ssl_ciphers ECDHE-RSA-AES128-GCM-SHA256:ECDHE:ECDH:AES:HIGH:!NULL:!aNULL:!MD5:!ADH:!RC4;
ssl_protocols TLSv1 TLSv1.1 TLSv1.2;
ssl_prefer_server_ciphers on;
access_log /var/log/nginx/access.log;
error_log /var/log/nginx/error.log;
location / {
try_files $uri $uri/ /index.php?$args;
}
location ~ \.php$ {
try_files $uri =404;
fastcgi_split_path_info ^(.+\.php)(/.+)$;
fastcgi_pass wordpress:9000;
fastcgi_index index.php;
include fastcgi_params;
fastcgi_param SCRIPT_FILENAME $document_root$fastcgi_script_name;
fastcgi_param PATH_INFO $fastcgi_path_info;
}
}
|
这里需要把自己的证书添加到宿主机的nginx目录下,因为前面做了目录映射,所以证书会自动映射到容器的conf.d目录中
常见BUG
/docker/api/client.py错误
容器服务没开……开启容器服务,重新运行

数据库错误
nginx一直重启
- 检查一下是不是配置了
https但是证书没有复制到目录内……
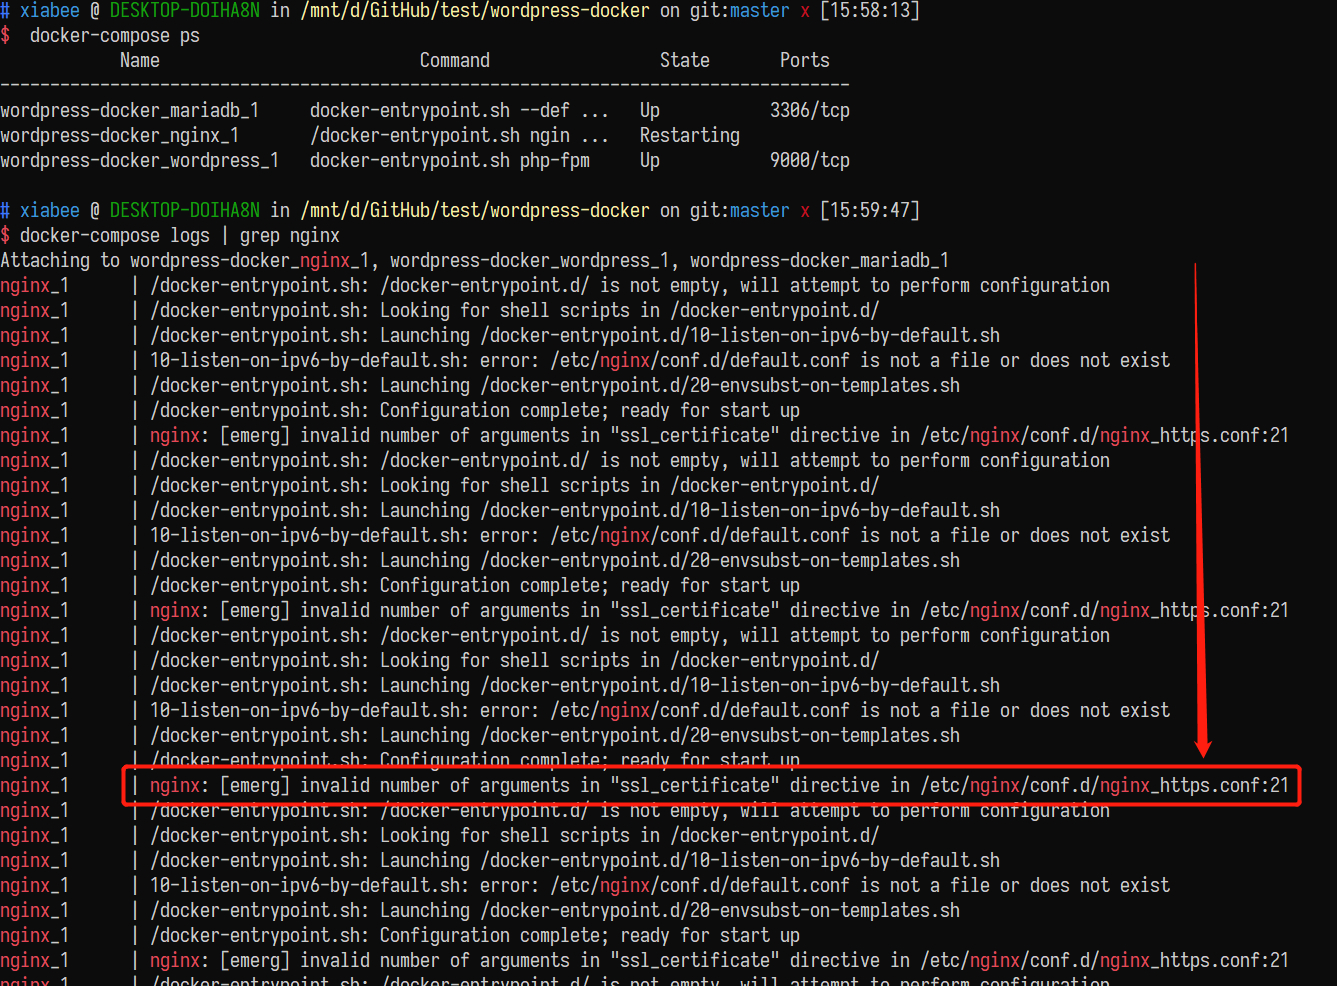
- 如果不想设置
https,那就直接把nginx_https.conf删掉,重启容器就行

最终安装
如果所有容器都正常启动了,直接访问你的IP/域名应该就能看到安装界面了(https服务如果没有做强制跳转,则需访问你域名的443端口才能访问)
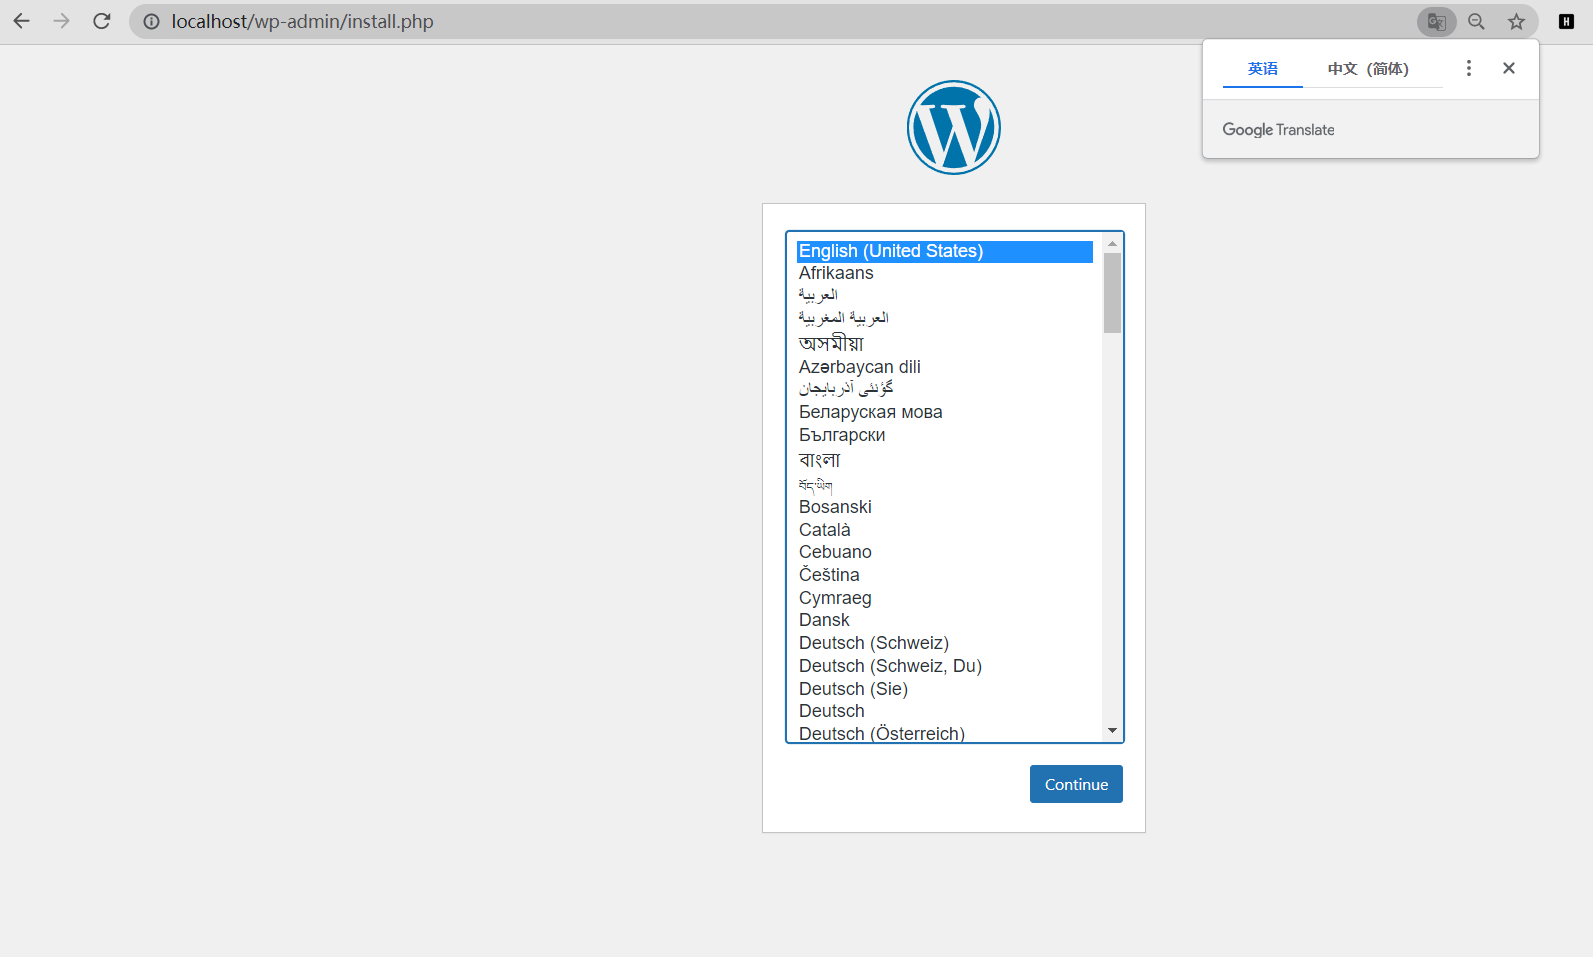
安装完成之后,剩下的事情对着说明做就行了,如果实在看不懂就装个中文版的……
关于主题